Master Pages in ASP.NET 2.0 (Practical)

In this post we'll build a simple master page , we talked about the master pages in previous post

Creating Master Page (Download Sample)

  • Open Visual Studio 2005.
  • Create new ASP.NET Web site , enter name as MasterPagesApp.
  • Select Location as File System , and enter the path as D:\WhidbeyWebSites\MasterPagesApp. ( or any other path ).
  • Select the Language you are more comfortable with, for this we will use C#.
  • After creating the new Web Site you will find a page created for you named Default.aspx.
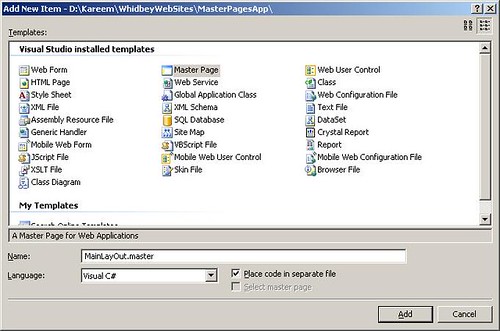
  • Delete this page and right click the application from solution explorer select Add New Item select Master Page from installed visual studio templates and name it MainLayout , and check the Place code in separate file checkbox; this will create you a code-behind in the language you select , we work here using C#


  • The MainLayOut.master will be open in Source view you will find this master page directive at the beginning :

    <%@ Master AutoEventWireup="true" CodeFile="MainLayOut.master.cs" Inherits="MainLayOut" Language="C#" %>

    As you see the attributes of the Master directive is common to the ones of the Page directive, and they are self-descriptive; CodeFile is the path of the code behind file it can be VB or C# noting that in one Web Site you can mix between both languages , Inherits decides the class within the code file to be used , Language is the language of the code behind file, AutoEventWireup is so important ; for any page there is an automatic way to bind the events to methods in the same aspx file or in code behind , if this attribute is true ( default value is true so if it's not mentioned it will be true ) page events are automatically bound to methods that are using naming convention as Page_event , for example Page_Load, Page_Init, and Page_PreInit (this is event is fired before creating the controls of the page), this has one disadvantage that the standarad events of the page should adhere to this naming convention, but if you set it to false it it will give you more flexibility to use any names for the event handlers , here we should remember the importance of Handles keyword in VB.NET.

    You should always examine the following section:

    <asp:contentplaceholder id="ContentPlaceHolder1" runat="server"></asp:contentplaceholder>

    This server control is the most important for the master pages as this is the zone in which the content pages will be rendered.
  • Switch to the Design of the master page you will get the ContentPlaceHolder1 shown, now you can design the master page just as any aspx page, so for this practice we'll do a simple master page.
  • From Layout menu select Insert Table, Select Template option, then select Header , footer and side, then drag the ContentPlaceHolder1 control into the right middle cell of the table you have just added.
  • Add one label into the left middle cell,and the logo of CodeProject to the upper cell of the table, you should have the same as in the following figure


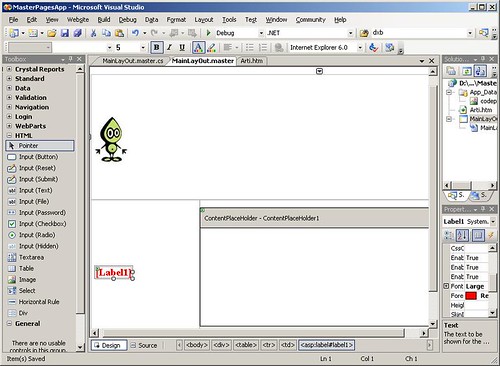
    Note : you should make all the paths in the master page relative to one folder because the image path will be relative to the rendered content page not for the master page, it's advisable to create one images folder to hold all your images, for example the logo of CodeProject image path is : ./images/codeprojectlogo.JPG, when the content page renders teh path will be evaluated to http://localhost:4843/MasterPagesApp/images/codeprojectlogo.JPG.
  • Double click anywhere at the master page this will open the code behind and will add the Page_Load event handler you can write the following code :

    Label1.Text = "The Time of Server is: " + DateTime.Now.TimeOfDay;

    this will show the time of the server at the label

Creating Content Page

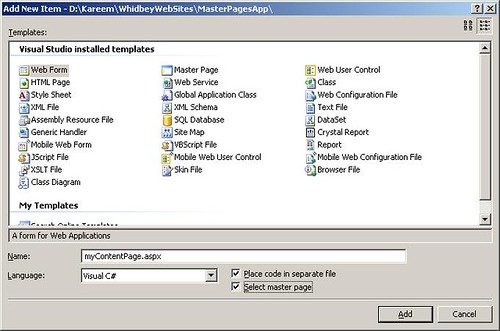
You should know that the content page is just one aspx page but you bind this page to one master page while you are creating it , Right click your web application from solution explorer and select Add New Item , select Web Form from the installed templates and check Select Maser Page, enter the name of the new page as myContentPage.aspx as in the following figure


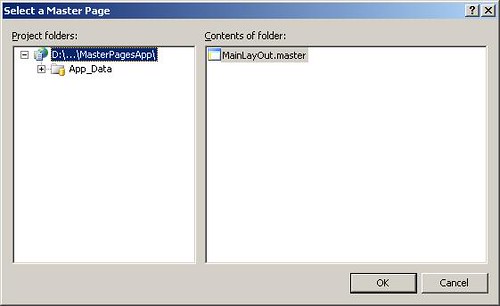
Because you have checked the Select Master Page box you will get the following dialog to select one master page , this will bind the new aspx page to the selected master page as shown in the following figure


The page you have just added will open in source view and you will find one add the MasterPageFile attribute set to the value of the master page file you have selected before this should be assigned the value ~/MainLayOut.master, you will also find one Content server control added by default and the attribute ContentPlaceHolderID assigned to ContentPlaceHolder1 this is the default value which refers to the ContentPlaceHolder control at the master page and if you have renamed this control at the master page you should change it now to the correct Id, this sets the zone in which this content page will be shown as we said before.

Switch to the design view of myContentPage.aspx you will get the following figure which shows all the master page contents added by all the contents of the master page is dim because they are not editable , only the Content1 will be enabled if you click the white area, and you can now add any controls just as you do for any aspx page.

Double click the white area of Content1 you will get the event handler of Page_Load , add the following line :

Label1.Text = this.MasterPageFile;

This will show the path of the Master Page file into the label , Actually you can get a reference to the Master Page from a content page by using the Master property which refers to the page's master page , furthermore you can refer to any control on the master page by using this.Master.FindControl(string id) , this method takes the Id of the control on the master page and returns Control object , so you should cast to the data type of the control.

Saving Master Page path in web.config

There is one technique that you can make all the pages comprising your web application as content pages and you can bind all the pages to one master page, this master page that will be a template to your entire application it's advisable to save the path of this master page into web.config, you can do that using the following :

<configuration>
<pages masterpagefile="~/sitetemplate.master">
</configuration>


if you specify a MasterPageFile for your page it will override your web.config value but the importance of the value of web.config that it gurantees that all the pages added to your application are bound to this master page file, so if you have more than one master page you can just change the web.config value , and this will update the whole application pages with no need to recompile; Indeed this technique was a trend at ASP.NET 1.x , as some developers were making all the pages as user controls and pass the id of the user control at the required page URL

Conclusion

Master Pages are a great addition to ASP.NET 2.0, it's a good way to templatize your application , as we've seen you can change the master page from web.config , and you can access the master page from child content pages by using this.Master , Thanks to Master Pages !

Master Pages in ASP.NET 2.0

Overview
In ASP.NET 1.1 to give your application a coherent style you were using user controls to make one footer and one header, maybe you make one menu, then you drop those controls into each and every new page you add to your application , it's somehow a good way to make a consistenet maintainable UI. Master Pages are an easier solution !

What are Master Pages ?
Master pages lets you make a consistent layout for your application , you can make one master page that holds the layout/look & feel and common functionality of your whole application and upon this master page you can build all the other pages, we call these pages Content Pages, So simply you can build your master page and then build content pages , and while creating the content pages you bind the content pages to the master page you have created before, those two pages are merged at runtime to give you the rendered page.

Master Pages and ContentPlaceHolders
The master page has the extension .master and it's actually a aspx page but with the directive <%@ Master Language="C#"%> , instead of the standard page directive, almost the attributes of the Master directive are the same as that of the page, you can add any kind of controls the same as you design aspx pages, and it's advisable to use the menu conrol at your master page ( menu is one of the most nice added conrols to ASP.NET 2.0) .Every MasterPage should include at least one ContentPlaceHolder, this Control is a placeholder for the content that will be merged at runtime, noting that the content page is just an aspx standard page but you should supply the attribute MasterPageFile to the page directive to bind the content page to the master page , for example
<%@ Page Language="C#" MasterPageFile="~/MasterPages/SiteLayout.master"%>
Again you can design your content page just like any other aspx page adding any static text and server controls.

Content Server Conrtol
Inside the content pages you will find one Content server control added by default, actually when you add controls you add them to the content server control, for example
<asp:Content ID="Content1" ContentPlaceHolderID="ContentPlaceHolder1" Runat="Server">
the attribute ContentPlaceHolderID is very important as it decides that this content will be bound to which ContentPlaceHolder on the master page , this is a very nice way to decide the location of where the contents will be displayed; so this way you can have multiple content on one content page and also multiple ContentPlaceHolders on the master page, how nice !.
Note : the content pages don't include the common tags as <Body>, <Head>, remember that that was the same with user controls , as after merging there should be only one Body and Head tags.

Programmable Master Pages
Master Pages are programmable you can make one property to the master page and it will be visible to all the content pages, for example you can get one string like last build or last update from web.config file and provide it as a public property to all the content pages.

Maintainble Master Pages
The best thing about master pages is maintainability as you can now update on master page and this will update all your application pages that reference this master page.

Software Factories

Each and every project I start I find myself in need to a data access layer code to talk to database and I find myself in bad need to a good business model , I like to make the biz classes interrelated to each other the relations between biz classes is very important , Again you will be in bad need to a consistent usable UI layer and if you want to release yourself from the burden of maintenance it's advisable to build your pages using XML and XSLT together with the aid of CSS , So what about exception management and error logging ; I am sure that you will also need to manage your exceptions and it'll be great if you have someway to log exceptions into a file or into event log if you have the permission to , if you want more manageable exception management startegy you can send application administrators group a mail with the exception details and the user faced that exception.
I will not dig into this too much, but if you are like me and all the other poor developers who are getting bored from the reusable work they are forced to do from project to the other , you will like the idea of using Application blocks and using proven successful solution to common problems and situations (Design Patterns), so if you need to use a DAL code there is no need to re-invent the wheel and build your own from scratch you can use Data Access Application Block , to talk to your database regardless of the type of database you are using ( Oracle or SQL Server ).
Now , using the same idea Microsoft has presented the idea of Software Factories , we can define the software factory as a software product that can be plugged into or configure another extensible another bigger product, and the software factory itself is a combination of patterns , frameworks, and domain-specific languages.
So just like any factory you have seen, the software factory is just a factory to make one type of applications for example HR applications, and provide a plug 'n play components to make the creation of HR applications easier.
Microsoft launched Visual Studio Team System (VSTS) with the release of VS.NET 2005 Beta 2 , this is the next generation product from Microsoft to standardise the life cycle of software development applying all the good practices and schemes, it's a very big suite that is using SQL Server as a repository, MSF as the underlying methodology.
I am busy to say more , I hope this could be a short brief !

VS.NET 2005 Smart Tags

Smart Tags are a great new feature to VS.NET 2005 , it's simply a list of most required and usable features of one control.
We can take for example a DropDownList , if you are adding one DropDownList to an ASP.NET Page you can get the following view :

As you can see above you can show the smart tag for one control by clicking the small solid black arrow at the right top of the control and you get the most required and important feature you may need for that control , of course this varies from one control to the other, here for DropDownList ( as shown in the figure ) you may need to edit the items if the DropDownList is not bound to one data source and you may need to directly enable the AutoPostBack feature , and you can select DataSource as well.

Actually I enjoyed smart tags so much it's a great addition to VS.NET IDE.

Partial Classes in .NET 2.0

If you are familiar with ASP.NET 1.1 , you must know that if you are composing one aspx page right from your designer and you go to the code-behind of your aspx page you will find all the controls of the page are declared as protected variables in your class that inherits from System.Web.UI.Page , now in ASP.NET 2.0 Microsoft introduced a new term which is "Partical Classes" if you design one page in the webforms desigener and you switch to code view you will not find any conrols declared you will just find a definition for one class for example :

public partial class EditEmployees_aspx
{

}

And you will find at the top of the code-behind all the required namespaces required for that page , this keeps your code-behind compact and clean as it will only contains the event handlers and only custom code written by the progammer.

Have you ever wanted to add one method to a class shared between you and other team members but you cannot because one member is checking out the class file and the multiple checkouts is turned off by VSS administrator , I guess you faced it before.And in some situations you may need to divide your class into separate files as the file is getting bulky and you need to divide it.

Partial classes provide a solution for that problem as you can split one class on more than on source file and at compilation time all the files are merged to compile and get the full class output.

To split your class/struct/interface to more than one file you should use the keyword modifier partial

ASP.NET 1.1 and 2.0 Processes

Once you install ASP.NET 2.0 all the applications running on your machine will be mapped to the new version of .NET framework but this is not what you need if you want to run ASP.NET 1.1 applications while using ASP.NET 2.0 you can do one simple thing by opening your IIS manager ( I usually do it by typing into Run : inetmgr ) and you can right click your 1.1 application and select properties you will find one new tab added to your properties called "ASP.NET" , you can select the version you want your application to run under in this case select "1.1.4322.0". This will map your application to ASP.NET 1.1 not 2.0.

You can do one other thing by editing configuration of your web application just go and select the properties again and on the "Virtual Directory" tab, click "Configuration" button , you will get another property pages dialog box , you should select the "Mappings" tab , which is the first one, and from extenstions select the "aspx" extension and click "Edit" and make sure that you are pointing to the extension "c:\windows\microsoft.net\framework\v1.1.4322\aspnet_isapi.dll" or point to the framework version you need.

You may face on other problem when running ASP.NET 1.1 and 2.0 versions side by side, note that 2 different versions application cannot run side by side inside one process. You should aviod that otherwise you will get the famous "Server Unavailable" error message.

So we need to make the IIS able to serve 1.1 applications and 2.0 applications side by side , and make them run in different processes this can be eaisly acheived by the new isolation feature of IIS 6 which is provided under "Application Pools". the rule is simply that 2 different applications have different application pools run in completely different isolated processes.

So you should make a new application pool and assign it to your 2.0 Applications by doing the following from IIS manager :
  1. Right-click the Web Sites folder and click Properties.
  2. On the Service tab, clear the Run Web service in IIS 5.0 isolation mode check box.
  3. Right click application pools node and add a new one call it any name you want.
  4. You can now assign that application pool to the application you need from the directory tab in properties dialogbox.