Master Pages in ASP.NET 2.0 (Practical)
In this post we'll build a simple master page , we talked about the master pages in previous post
Creating Master Page (Download Sample)
- Open Visual Studio 2005.
- Create new ASP.NET Web site , enter name as MasterPagesApp.
- Select Location as File System , and enter the path as D:\WhidbeyWebSites\MasterPagesApp. ( or any other path ).
- Select the Language you are more comfortable with, for this we will use C#.
- After creating the new Web Site you will find a page created for you named Default.aspx.
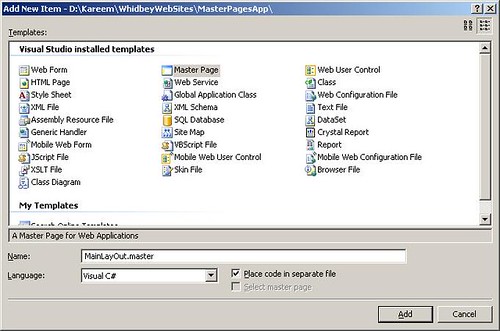
- Delete this page and right click the application from solution explorer select Add New Item select Master Page from installed visual studio templates and name it MainLayout , and check the Place code in separate file checkbox; this will create you a code-behind in the language you select , we work here using C#

- The MainLayOut.master will be open in Source view you will find this master page directive at the beginning :
<%@ Master AutoEventWireup="true" CodeFile="MainLayOut.master.cs" Inherits="MainLayOut" Language="C#" %>
As you see the attributes of the Master directive is common to the ones of the Page directive, and they are self-descriptive; CodeFile is the path of the code behind file it can be VB or C# noting that in one Web Site you can mix between both languages , Inherits decides the class within the code file to be used , Language is the language of the code behind file, AutoEventWireup is so important ; for any page there is an automatic way to bind the events to methods in the same aspx file or in code behind , if this attribute is true ( default value is true so if it's not mentioned it will be true ) page events are automatically bound to methods that are using naming convention as Page_event , for example Page_Load, Page_Init, and Page_PreInit (this is event is fired before creating the controls of the page), this has one disadvantage that the standarad events of the page should adhere to this naming convention, but if you set it to false it it will give you more flexibility to use any names for the event handlers , here we should remember the importance of Handles keyword in VB.NET.
You should always examine the following section:
<asp:contentplaceholder id="ContentPlaceHolder1" runat="server"></asp:contentplaceholder>
This server control is the most important for the master pages as this is the zone in which the content pages will be rendered. - Switch to the Design of the master page you will get the ContentPlaceHolder1 shown, now you can design the master page just as any aspx page, so for this practice we'll do a simple master page.
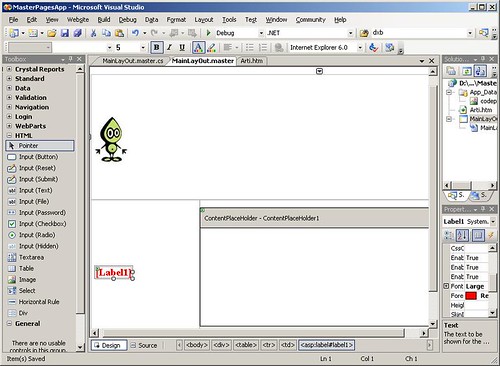
- From Layout menu select Insert Table, Select Template option, then select Header , footer and side, then drag the ContentPlaceHolder1 control into the right middle cell of the table you have just added.
- Add one label into the left middle cell,and the logo of CodeProject to the upper cell of the table, you should have the same as in the following figure

Note : you should make all the paths in the master page relative to one folder because the image path will be relative to the rendered content page not for the master page, it's advisable to create one images folder to hold all your images, for example the logo of CodeProject image path is : ./images/codeprojectlogo.JPG, when the content page renders teh path will be evaluated to http://localhost:4843/MasterPagesApp/images/codeprojectlogo.JPG. - Double click anywhere at the master page this will open the code behind and will add the Page_Load event handler you can write the following code :
Label1.Text = "The Time of Server is: " + DateTime.Now.TimeOfDay;
this will show the time of the server at the label
Creating Content Page
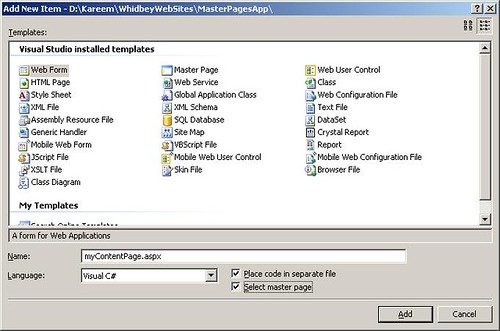
You should know that the content page is just one aspx page but you bind this page to one master page while you are creating it , Right click your web application from solution explorer and select Add New Item , select Web Form from the installed templates and check Select Maser Page, enter the name of the new page as myContentPage.aspx as in the following figure

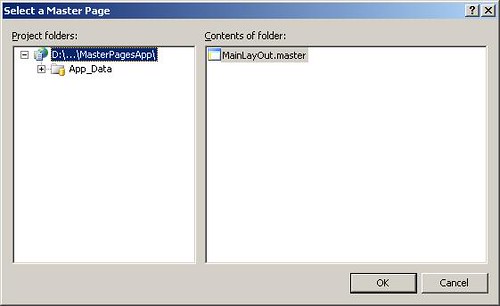
Because you have checked the Select Master Page box you will get the following dialog to select one master page , this will bind the new aspx page to the selected master page as shown in the following figure

The page you have just added will open in source view and you will find one add the MasterPageFile attribute set to the value of the master page file you have selected before this should be assigned the value ~/MainLayOut.master, you will also find one Content server control added by default and the attribute ContentPlaceHolderID assigned to ContentPlaceHolder1 this is the default value which refers to the ContentPlaceHolder control at the master page and if you have renamed this control at the master page you should change it now to the correct Id, this sets the zone in which this content page will be shown as we said before.
Switch to the design view of myContentPage.aspx you will get the following figure which shows all the master page contents added by all the contents of the master page is dim because they are not editable , only the Content1 will be enabled if you click the white area, and you can now add any controls just as you do for any aspx page.
Double click the white area of Content1 you will get the event handler of Page_Load , add the following line :
Label1.Text = this.MasterPageFile;
This will show the path of the Master Page file into the label , Actually you can get a reference to the Master Page from a content page by using the Master property which refers to the page's master page , furthermore you can refer to any control on the master page by using this.Master.FindControl(string id) , this method takes the Id of the control on the master page and returns Control object , so you should cast to the data type of the control.
Saving Master Page path in web.config
There is one technique that you can make all the pages comprising your web application as content pages and you can bind all the pages to one master page, this master page that will be a template to your entire application it's advisable to save the path of this master page into web.config, you can do that using the following :
<configuration>
<pages masterpagefile="~/sitetemplate.master">
</configuration>
if you specify a MasterPageFile for your page it will override your web.config value but the importance of the value of web.config that it gurantees that all the pages added to your application are bound to this master page file, so if you have more than one master page you can just change the web.config value , and this will update the whole application pages with no need to recompile; Indeed this technique was a trend at ASP.NET 1.x , as some developers were making all the pages as user controls and pass the id of the user control at the required page URL
Conclusion
Master Pages are a great addition to ASP.NET 2.0, it's a good way to templatize your application , as we've seen you can change the master page from web.config , and you can access the master page from child content pages by using this.Master , Thanks to Master Pages !


 RSS and Blogs

<< Home