
File Upload User Control
Introduction Download File Uploader
A friend of mine was in very bad need to a File Upload User Control, I searched Google many times but I couldn't find the control I need, then I refered to DotNetNuke then I found one user control written in VB.NET, I wondered why I didn't find any control verifying this simple functionality so I decided to create my own simple one.
Creating File Upload User Control
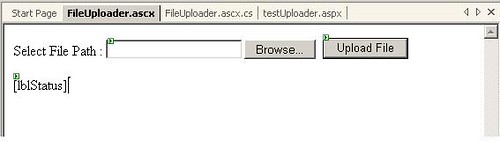
Create one new web application form VS.NET and add one new user control, drag and drop one file field control from HTML tab from toolbox and then drag one button ana a label, now you should have the following
public string ServerFolderPath;
this property will hold the name of the upload folder and we'll use it later, then double click the Upload file button to get the click event handler and write the following code :
As you can see the code is self descriptive you just extract the name of the file to be uploaded and then you concatenate it with the folder that you will upload to, and you should use Server.MapPath to just get the physical path of the upload folder and using fileUpload.PostedFile.SaveAs , you get your file uploaded and if any unexpected issue happens, the exception will be managed and you write the exception message into the status label.try
{string strFileName ;
strFileName =
fileUpload.PostedFile.FileName;
strFileName =
strFileName.Substring(strFileName.LastIndexOf("\\")+1);
fileUpload.PostedFile.SaveAs(Server.MapPath(this.ServerFolderPath) + "\\" +
strFileName);
lblStatus.Text = strFileName + " Written Successfully to folder " + this.ServerFolderPath;}
catch ( Exception exc)
{lblStatus.Text = exc.Message;}
Consuming the File Upload
Now we will consume the user control we've just finished you can add one new webform and drag and drop the user control into the design area, but you need to do following :
- Switch to the HTML view of the page and add this attribute ServerFolderPath="Uploads" , this is the name of the folder to which you will upload files this folder is under the root folder with one single level.
- Add this attribute to the form tag of the page that's going to consume the user control EncType="multipart/form-data" , this attribute tells the form to accept the uploaded files, otherwise you will get one exception.
- Switch to windows explorer and go to the upload folder that you will upload files to and grant the ASPNET process a write permission to be able to write files to this folder; you can do so by right clicking the desired folder and selecting properties -> Security tab -> click Add button and write aspnet ( or : machineName\aspnet ) , then hit the enter button, you will get the user listed in the users list, select it and grant write permission from the below permissions list.
Now you can run your application and test the upload it should be working properly .
Conclusion
As you have seen it's very simple to make a file upload user control, maybe this is not the best way to design this control but it's functional and simple, furthermore you can add multiple instances to your webform and upload mutliple files.
posted by Cairo Cafe at Monday, June 20, 2005
![]()
![]()


 RSS and Blogs

<< Home